Hero reveal con AI
El efecto del hero de este sitio: por fuera mi foto real, y bajo el cursor se asoma mi modo AI-native dentro de un círculo de luz. Dos imágenes gemelas de ChatGPT, un script de 10 líneas y CSS que corre en GPU.
La demo
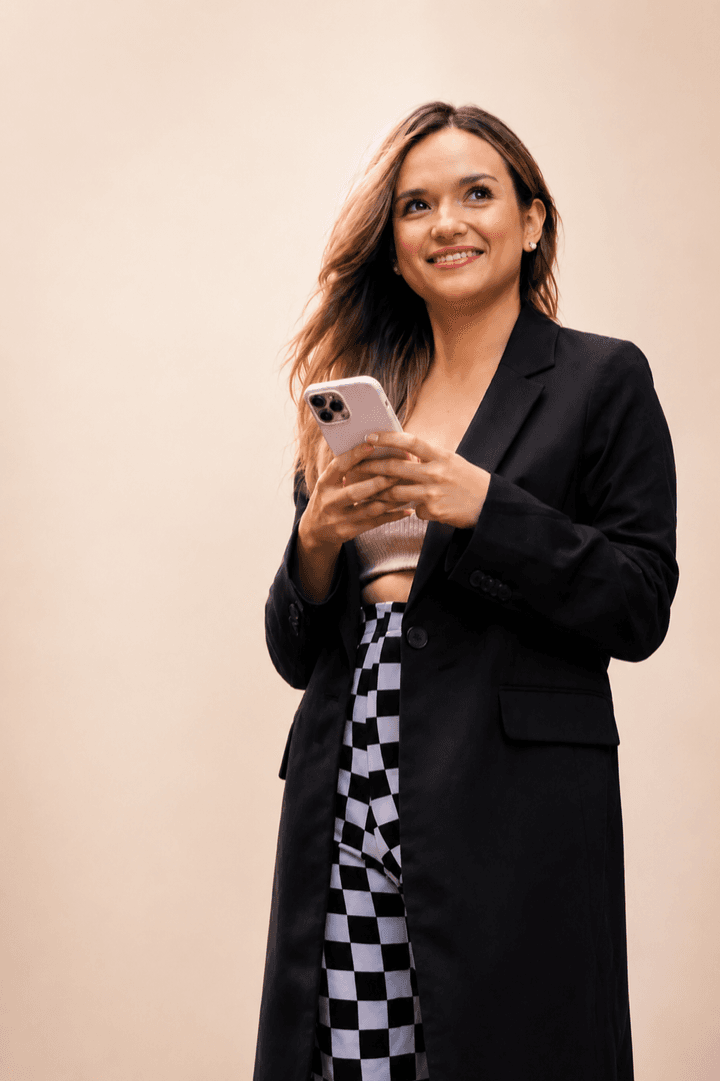

El sistema
 ChatGPTreveal con identity lock + gemela base
 Python + Pillowresize + crop, corrige el 5% de desfase
Las herramientas
ChatGPTimágenes
Genera las dos gemelas usando mi foto real como referencia. El identity lock va en el prompt.
Python + Pillowalineación
10 líneas que corrigen el encuadre desplazado. El paso que nadie te cuenta.
Replícalo paso a paso
El código, las conexiones y los errores que ya cometí por ti.
Genera la reveal con identity lock
La imagen que se asoma bajo el cursor sale de ChatGPT usando tu foto real como referencia. La clave es el candado de identidad: le prohíbes tocar a la persona y solo le permites transformar el mundo alrededor. Este es el prompt real que usé:
prompt · imagen reveal (ChatGPT)Use the attached image as the reference. Keep the woman EXACTLY as she is: do not change her face, skin, hair, expression, body, pose, outfit, the phone in her hands, or the framing and crop. Her identity must stay 100% identical to the reference, same person, untouched. Only transform the WORLD around her into "AI-native command mode": the background city dissolves into a luminous, elegant orchestration of growth dashboards, flowing data streams and AI workflow nodes (minimal, not cluttered). Brand palette only: warm orange (#fe6f01), magenta-pink and soft lavender, glowing over a cream base. A subtle glowing letter "W" emblem of light hovers beside her as her insignia. Soft orange and magenta rim light along the edge of her blazer and hair. Cinematic, premium, optimistic, semi-realistic editorial quality. Keep the same vertical 2:3 crop and the negative space on the left. No text, no logos, no watermark. Negative prompt: cartoon, flat illustration, anime, distorted face, extra fingers, deformed hands, cluttered, busy background, text, logos, watermark, low quality, blurry facePídele la gemela base
Para que el efecto funcione, la imagen visible y la oculta deben ser gemelas: misma persona, misma pose, mismo encuadre. El truco es pedirle las dos al mismo modelo, en la misma sesión y con el mismo candado, para que el grano y el render coincidan. Solo cambia el mundo:
prompt · gemela base (ChatGPT)Use the attached image as the reference. Keep the woman EXACTLY as she is: do not change her face, skin, hair, expression, body, pose, outfit, the phone in her hands, or the framing and crop. Her identity must stay 100% identical to the reference, same person, untouched. Render the SAME photo with no effects: keep the world natural and calm, soft warm light over a cream base, premium semi-realistic editorial quality. No dashboards, no data streams, no glow, no emblem. Keep the same vertical 2:3 crop and the negative space on the left. No text, no logos, no watermark.Alinea las gemelas con 10 líneas de Pillow
Aunque el prompt diga “mismo encuadre”, ChatGPT nunca devuelve el crop exacto: la mía regresó con un 5% de desplazamiento y la cara brincaba al pasar el cursor. Lo arreglé con un mini script de Pillow: escalar y recortar la base hasta que las dos queden pixel-perfect.
python · align.py# align.py · alinea la gemela base con la reveal (Pillow) # ChatGPT devolvió la base ~5% desplazada: se corrige con resize + crop. from PIL import Image REF = "reveal.png" # la imagen que manda (el encuadre correcto) SRC = "base.png" # la gemela desalineada SCALE = 1.05 # factor de corrección (mi caso: 5%) DX, DY = 0, -18 # ajuste fino en píxeles (a ojo, iterando) ref = Image.open(REF) src = Image.open(SRC).convert("RGB") # 1. Escalar la base por el factor de corrección w, h = ref.size big = src.resize((round(w * SCALE), round(h * SCALE)), Image.LANCZOS) # 2. Recortar el centro (más el ajuste fino) al tamaño exacto de la reveal left = (big.width - w) // 2 + DX top = (big.height - h) // 2 + DY big.crop((left, top, left + w, top + h)).save("base-aligned.png")Móntalo: clip-path + lerp del cursor
Dos imágenes apiladas. La de arriba (modo AI) se recorta con un clip-path circular que sigue al cursor con suavizado (lerp) dentro de un requestAnimationFrame. El radio abre rápido y cierra suave, y todo se compone en GPU:
html + css + js · el efecto completo<div class="stage"> <img class="base" src="base-aligned.png" alt="" /> <img class="reveal" src="reveal.png" alt="" /> </div> <style> .stage { position: relative; } .stage img { position: absolute; inset: 0; width: 100%; } .reveal { clip-path: circle(var(--r, 0px) at var(--x) var(--y)); } @media (prefers-reduced-motion: reduce) { .reveal { display: none; } } </style> <script> const stage = document.querySelector(".stage"); let rawX = 0, rawY = 0, x = 0, y = 0, r = 0, targetR = 0; stage.addEventListener("mousemove", (e) => { const b = stage.getBoundingClientRect(); rawX = e.clientX - b.left; rawY = e.clientY - b.top; targetR = 150; /* radio del foco */ }); stage.addEventListener("mouseleave", () => { targetR = 0; }); (function frame() { x += (rawX - x) * 0.14; /* lerp: el viaje suave del foco */ y += (rawY - y) * 0.14; /* abre rápido (0.16), cierra suave (0.08) */ r += (targetR - r) * (targetR > r ? 0.16 : 0.08); stage.style.setProperty("--x", x.toFixed(1) + "px"); stage.style.setProperty("--y", y.toFixed(1) + "px"); stage.style.setProperty("--r", Math.max(0, r).toFixed(1) + "px"); requestAnimationFrame(frame); })(); </script>El fallback también es diseño
En pantallas táctiles el dedo hace de cursor, y con prefers-reduced-motion la capa reveal se desactiva y queda la foto base. Un efecto que marea no es un efecto premium.
La Escuelita ya no es una lista de espera: es un taller en vivo
Creación de contenido con AI. Jueves 16 de julio, 4pm CDMX. Elige tu puerta:
El taller en vivo
2 horas conmigo · sales con 30 días de contenido de tu negocio, hechos y programados · te llevas materiales que puedes usar cuando quieras · la grabación queda tuya para siempre.
Quedan 13 lugaresReservar mi lugar →Te mantengo al tanto
¿Quieres que te envíe actualizaciones de nuevos cursos y talleres? Déjame tu correo.
Cero spam. Solo cosas que sirven.Sigue con estos